Many people have computers that come with Windows XP so they may never have to install it. However, you may need to install Windows XP if:
- You replaced your hard disk drive with a new hard disk
drive that does not have Windows XP installed.
- You are reinstalling Windows XP on a computer
because you want to clean off your hard drive and remove any unwanted
programs, such as spyware.
- You purchased a computer without an operating system.
Pre-installation
checklist
Before you begin the installation
process, use this checklist to make sure that you are prepared:
- You have the Windows XP CD.
- You have the product key available. The product key is
located on your Windows XP CD case and is required to install and
activate Windows XP.
- Your computer hardware is set up. At a minimum, you
should connect your keyboard, mouse, monitor, and CD drive. If available,
you should connect your computer to a wired network.
- You have Windows XP
drivers available. Drivers are software that Windows XP uses to communicate
with your computer’s hardware. If you do not have drivers available,
Windows XP may already include drivers for your hardware. If not, you
should be able to download them from your hardware manufacturer’s website
after you set up Windows XP.
- If you are reinstalling
Windows XP on an existing computer, you need a backup copy of your
files and settings. The installation process will delete all of your
files. You can use the File and Settings Transfer Wizard to store your
files and settings on removable media and then restore them after
installation is complete.
Installation
process
Installing Windows XP can take
up to two hours. To make the process more manageable, it has been broken up
into several sections.
- Insert the Windows XP CD
into your computer and restart your computer.
- If prompted to start from the
CD, press Spacebar. If you miss the prompt (it only appears for a few
seconds), restart your computer to try again.
- Windows XP Setup begins.
During this portion of setup, your mouse will not work, so you must use
the keyboard. On the Welcome to Setup page, press Enter.
- On the Windows XP
Licensing Agreement page, read the licensing agreement. Press the Page
Down key to scroll to the bottom of the agreement. Then press F8.
- This page enables you to select
the hard disk drive on which Windows XP will be installed. Once you
complete this step, all data on your hard disk drive will be removed and
cannot be recovered. It is extremely important that you have a recent
backup copy of your files before continuing. When you have a backup copy,
press D, and then press L when prompted. This deletes your existing data.
- Press Enter to select
Unpartitioned space, which appears by default.
- Press Enter again to select
Format the partition using the NTFS file system, which appears by default.
- Windows XP erases your
hard disk drive using a process called formatting and then copies the
setup files. You can leave your computer and return in 20 to 30 minutes.
To
continue the installation
1. Windows XP restarts and then continues with
the installation process. From this point forward, you can use your mouse.
Eventually, the Regional and Language Options page
appears. Click Next to accept the default settings. If
you are multilingual or prefer a language other than English, you can change
language settings after setup is complete.
2. On
the Personalize Your Software page, type your name and
your organization name. Some programs use this information to automatically
fill in your name when required. Then, click Next.
3. On
the Your Product Key page, type your product key as it
appears on your Windows XP CD case. The
product key is unique for every Windows XP
installation. Then, click Next.
4. On
the Computer Name and Administrator Password page, in the
Computer name box, type a name that uniquely identifies
your computer in your house, such as FAMILYROOM or TOMS. You cannot use spaces
or punctuation. If you connect your computer to a network, you will use this
computer name to find shared files and printers. Type a strong password that
you can remember in the Administrator password box, and
then retype it in the Confirm password box. Write the
password down and store it in a secure place. Click Next.
5. On
the Date and Time Settings page, set your computer’s
clock. Then, click the Time Zone down arrow, and select
your time zone. Click Next.
6. Windows XP will spend about a minute
configuring your computer. On the Networking Settings
page, click Next.
7. On
the Workgroup or Computer Domain page, click Next.
To
complete the installation
1.
Windows XP will
spend 20 or 30 minutes configuring your computer and will automatically restart
when finished. When the Display Settings dialog appears,
click OK.
2.
When the Monitor Settings dialog
box appears, click OK.
3.
The final stage of setup begins. On the Welcome
to Microsoft Windows page, click Next.
4.
On the Help protect your PC page,
click Help protect my PC by turning on Automatic Updates now.
Then, click Next.
5.
Windows XP will
then check if you are connected to the Internet:
o If
you are connected to the Internet, select the choice that describes your
network connection on the Will this computer connect to the
Internet directly, or through a network? page. If you’re not sure,
accept the default selection, and click Next.
o If
you use dial-up Internet access, or if Windows XP
cannot connect to the Internet, you can connect to the Internet after setup is
complete. On the How will this computer connect to the Internet?
page, click Skip.
6.
Windows XP Setup
displays the Ready to activate Windows? page. If you are
connected to the Internet, click Yes, and then click Next. If you are not yet connected to the Internet, click No, click Next, and then skip to step 24.
After setup is complete, Windows XP will
automatically remind you to activate and register your copy of Windows XP.
7.
On the Ready to register with Microsoft? page, click Yes, and then click Next.
8.
On the Collecting Registration
Information page, complete the form. Then, click Next.
9.
On the Who will use this computer?
page, type the name of each person who will use the computer. You can use first
names only, nicknames, or full names. Then click Next.
10.
On the Thank you! page, click Finish.
Windows XP
setup is complete. You can log on by clicking your name on the logon screen. If
you’ve installed Windows XP on a new
computer or new hard disk drive, you can now use the File and Settings Transfer
Wizard to copy your important data to your computer or hard disk drive.
How to install and
use the Recovery Console in Windows XP
INTRODUCTION
We recommend that you
use the Recovery Console only after Safe mode and other startup options do not
work. The Recovery Console is recommended only if you are an advanced user who
can use basic commands to identify and locate problem drivers and files.
Additionally, you must be an administrator to use the Recovery Console.
There are two ways to start the Recovery Console:
There are two ways to start the Recovery Console:
- If
you cannot start your Windows and the Recovery Console has not been
installed on your computer before, you can run the Recovery Console from
your Setup CD.
- Alternative,
you can install the Recovery Console on your computer to make it available
in case that you cannot restart Windows. You can then select the Recovery
Console option from the list of available operating systems on startup.
How to
install the Recovery Console
You can
install the Recovery Console on your computer to make it available in case that
you cannot restart Windows. You can then select the Recovery Console option
from the list of available operating systems during startup. The Recovery
Console is recommended to be installed on important servers and on the
workstations of IT personnel. This article describes how to install the
Recovery Console to the Windows XP-based computer. To install the Recovery
Console, you must be logged on as an administrator.
Although you can run the Recovery Console by starting directly from the Windows XP CD, generally, it is more convenient to set it up as a startup option on your startup menu.
Although you can run the Recovery Console by starting directly from the Windows XP CD, generally, it is more convenient to set it up as a startup option on your startup menu.
To
install the Recovery Console, follow these steps:
- Insert the Windows XP CD
into the CD drive.
- Click Start, and then
click Run.
- In the Open box, type
d:\i386\winnt32.exe /cmdcons where
d is the drive letter for the CD drive. For Microsoft Windows XP
Professional x64 Edition, type d:\amd64\winnt32.exe
/cmdcons where d is the drive letter for the CD drive.
- A Windows Setup Dialog Box
appears. The Windows Setup Dialog Box describes the Recovery Console
option. To confirm the installation, click Yes.

- Restart
the computer. The next time that you start your computer, "Microsoft
Windows Recovery Console" appears on the startup menu.

Alternatively, you can use a Universal Naming
Convention (UNC)-established connection to install the Recovery Console from a
network share point.
Note You may receive an error message that is similar the following:
Note You may receive an error message that is similar the following:
Setup cannot continue
because the version of Windows on your computer is newer than the version on
the CD.
How to use the Recovery
Console
You can enable and disable
services, format drives, read and write data on a local drive (including drives
that are formatted to use the NTFS file system), and perform many other
administrative tasks. The Recovery Console is very useful if you have to repair
your computer by copying a file from a disk or CD-ROM to your hard disk, or if
you have to reconfigure a service that is preventing your computer from
starting correctly.
If you cannot start your Windows, you can run the Recovery Console from the Windows XP startup disks or the Windows XP CD-ROM.
After Windows XP is installed on your computer, to start the computer and use the Recovery Console. The Windows XP startup disks or the Windows XP CD-ROM are required.
Note To start the computer from the Windows XP CD-ROM, you must configure the basic input/output system (BIOS) of the computer to start from your CD-ROM.
To run the Recovery Console from the Windows XP startup disks or the Windows XP CD-ROM, follow these steps:
- Insert
the Windows XP startup disk into the floppy disk drive, or insert the
Windows XP CD-ROM into the CD drive, and then restart the computer.
Click to select any options that are required to start the computer from the CD drive if you are prompted. - When
the "Welcome to Setup" screen appears, press R to start the
Recovery Console.
- If you have
a dual-boot or multiple-boot computer, select the installation that you
must access from the Recovery Console.
- When you
are prompted, type the Administrator password. If the administrator
password is blank, just press ENTER.
- At the
command prompt, type the appropriate commands to diagnose and repair your
Windows XP installation.
For a list of commands that are available in Recovery Console, type recovery console commands or help at the command prompt, and then press ENTER.
For information about a specific command, type help commandname at the command prompt, and then press ENTER. - To exit the
Recovery Console and restart the computer, type exit
at the command prompt, and then press ENTER.
How to use the Recovery Console command prompt
When you use the Recovery Console, you are working
at a special command prompt instead of the ordinary Windows command prompt. The
Recovery Console has its own command interpreter. To enter this command
interpreter, you are prompted by Recovery Console to type the local
Administrator password.
When the Recovery Console starts, you can press F6 to install a third-party SCSI or RAID driver, in case that you need such a driver to access the hard disk. This prompt works the same as it does during installation of the operating system.
The Recovery Console takes several seconds to start. When the Recovery Console menu appears, a numbered list of the Windows installations on the computer appears. (Generally, only c:\Windows exists.) Press a number before you press ENTER, even when only one entry appears. If you press ENTER without selecting a number, the computer restarts and starts the process again.

When you see the prompt for %SystemRoot% (generally C:\Windows), you can start to use the available commands for the Recovery Console.

So I thought of writing a simple guide to cover Windows 7 installation procedure. Before we get into the innards of the installation you need to read below articles to make yourself familiar with Windows 7.
* Top 10 things to remember before installing Windows 7
* Installing Windows 7 using Virtual PC
* Installing Windows 7 using USB drive
Here, I assume that you have bootable Windows 7 DVD or USB and you have already kept a partition (Minimum 16GB) to install Windows 7. I assume that you have made necessary changes to the BIOS so that you can boot from DVD/USB.
1. Boot your PC using Windows 7 DVD/USB drive and press any key if you see “Press any key to continue message”
2. Next select your language, keyboard type (Generally US) and time format.

3. Click Install button.

4. Click the box labeled “I agree with the license terms” and click Next to proceed further.

5. In the next screen click on Custom (advanced) option. I hope you are not upgrading here. If you are doing an upgrade then just click on the Upgrade option.

6. This is the important step as you need to select the drive which you have already prepared for the Windows 7 installation. Note that selecting a wrong partition will wipe out the data. Also note that Windows 7 creates another small partition of 200 MB if you are installing Windows 7 on an empty hard drive. Don’t worry as the 200MB partition will not be shown in explorer.

7. You can also format the selected partition by opening drive option and then choosing Format option.
8. Click on Next button to start Windows 7 installation. Windows may restart many times during the installation and you need not to worry about that.


9. After completing the installation Windows will give you the below screen to enter your username and password.

10. In the next step you will be asked to enter the Product Key. Enter the key that you have got and click Next button.

11. Here you need to select the Windows 7 update option. Click “Use recommended settings”.
9. Select Time Zone, date and time and click Next.
10. In the next screen, you need to select the type of network. That is, choose between Home network, Work network and Public network.

11. Finally Windows will ask you to create a group depending on the type of Network you have chosen. If you are not sure, just skip as you can do it later as well.

12. You will see Windows 7 desktop. That is, you have successfully installed Windows 7 on your PC.
13.Don’t forget to read “10 things to do soon after installing Windows 7” to make your Windows 7 secure.
14. Good luck!
In this guide I will point out some important things that you need to do and remember before installing Windows 7 on your machine.

1.Check the hardware requirement: This is one of the most important factors that you need to keep in mind before thinking about Windows 7.Though Windows 7 should run fine with the 512 MB RAM system, it’s always better to follow Microsoft recommendations. Below are the Windows 7 requirements:
*A blank DVD
*A PC with a DVD burner
*A test PC for the Windows 7 Beta that meets these minimum hardware recommendations (specific to the Beta and subject to change in the final version of Windows 7). Please do not use a PC you rely on for your work or daily use:
*1 GHz 32-bit or 64-bit processor
*1 GB of system memory
*16 GB of available disk space
*Support for DirectX 9 graphics with 128 MB memory (in order to enable Aero theme)
*DVD-R/W Drive
*Internet access (to download the Beta and get updates)
2. Backup Vista: If you are planning to upgrade from Vista SP1(SP1 is must) then it’s a good idea to backup your Vista drive so that you can revert back to Vista easily. I hope most of you know how to do back up task!
3. You need to backup all your profiles and other important files that I have listed below. In case you are planning to wipe out Vista and install Windows 7 then also it’s better to create a backup of all profiles. Below are the important profiles that I backup:

*Documents
*Outlook pst file
*Windows live writer folder
*Saved games
*Other program profiles that you use.
4. The most important thing for a web addict is browser bookmark folder. Use backup Bookmarks option in your browser to create a bookmark. Download Password Exporter add-on for Firefox to backup all your saved passwords. Also don’t forgot jot down all installed add-ons!

You can even use Mozilla Restorator to backup full Firefox profile.
5. If you have installed too many programs then it’s a good idea to generate list of installed application using a simple command that I have explained in the Generate list of installed applications guide.
6. Next obvious task is to backup all the custom settings that you have done to your Vista. Of course, you can back up! Type Windows Easy Transfer in Start Menu search box and hit enter to open. Follow the simple instructions to complete the task.

Windows Easy Transfer helps you move your many files, folders, and program settings from one computer to another—all in one process.
Using Windows Easy Transfer, you can choose to move:
#User accounts
#Documents
#Music
#Pictures
#E–mail
#Internet favorites
#Program settings
7. Move your Download folder from the “C” drive to any other safe location so that you will not lose the downloaded files.
8. Though Microsoft recommends 16GB drive to install Windows 7 I recommend at least 30GB so that you won’t run out of free space in near feature.
9. If you have any files in Desktop just move to safe place since most of us keep important files on Desktop for quick access.

10. Last but least, don’t forget to retrieve Office and other product keys using free programs like Winkey Finder.
Most of the desktops and laptops today come with Windows Vista preinstalled. But if you are planning to try out the new Windows 7 operating system then VPC (Virtual PC) is the best way to install. It’s completely safe and easy to install an operating system in VPC without creating a new partition to install new one.
Though you can dual boot Windows 7 with Vista (Vista installed first), it’s a good idea to use Virtual PC to install Windows 7 inside the already installed Vista. For those who don’t know, Microsoft Virtual PC let’s you run multiple operating systems at the same time on the same physical system. You can switch between two operating systems within seconds.
Also read my “10 Things to remember before installing Windows 7” guide to make sure things work fine.
In this tutorial we will show you how to install Windows 7 inside Windows Vista using Microsoft Virtual PC.
Requirements:
* Windows 7 DVD
* Microsoft Virtual PC (free)
Procedure:
1. Download and install Virtual PC from here.
2. Run the Virtual PC software. To do this, type Virtual PC in Vista Start menu search box and hit enter.
3. Click on “New” option and click “Next” to continue.

4. Select “Create a virtual machine” option from the available three options. I prefer this option as this lets you customize as you like. Click “Next”.
5. Here, type a name for the new virtual machine. The file is automatically saved to the My Virtual Machines folder. To save it to a different location, use the “Browse” button.
6. Select the operating system that you would like to install using Virtual PC from the drop down box. In this tutorial we choose “Other” since Windows 7 option is not available in VPC as of now . After selecting the operating system, click “Next”.

7. If you have more than 1GB of RAM in your system, select “Adjusting the RAM” else select “Using the recommended RAM”. If you have chosen “Adjusting the RAM” then, select the amount of RAM you would like to allocate to run Virtual machine (Windows 7) and click “Next”. (By default, it will use 662 MB of RAM, if you like to keep as it is, blindly click “Next”).

8. In the next screen, select “A new virtual hard disk” and once again “click” button.
9. In this step, browse the location where you want to create a virtual hard disk and specify a name for the virtual hard drive. Also don’t forget to specify the size of the Virtual Hard Drive. I prefer at least 16GB (Recommended by Microsoft).

10. Click finish button.
11. This will open a small window called “Virtual PC Console”. Click on “Start” button to start the actual process.
12. Insert your Windows 7 DVD in to the optical drive or plug-in bootable USB drive (using USB drive you can install in just 10-15 minutes) and hit enter when Virtual PC console prompts this window. (No need to restart your system. System will be restarted inside the console).

You will see the Windows 7 installing environment inside the console.

13. Install the Windows 7 inside the console with the default Windows 7 installing procedure that you know. Once you finished your installation you will see this Window.
14. Now, you can install all the required programs for your Windows 7.
15. You can close the Virtual PC with a simple click on the “close”(top right) button.
16. To open your Virtual 7 once again, type “Virtual PC”(without quotes) in the Start menu and select your Virtual Windows 7 from the box and click “Start”.

17. You are done!!
18. Enjoy!!!
Learn how to install Windows Vista
Service Pack 2 (SP2)
Windows Vista Service Pack
2 (SP2) includes support for new types of hardware and emerging hardware standards
and includes all of the updates that have been released since SP1. For more
information, see What's
included in Windows Vista Service Pack 2
(SP2).
How to get SP2
The recommended (and easiest) way to get SP2 is to turn on
automatic updating in Windows Update in
Control Panel, and wait for Windows Vista
to notify you that SP2 is ready to install. You just need a few clicks to begin
the installation and the rest of the process is automatic.
In order to install SP2, you must first have Windows Vista Service Pack 1 installed. For
more information, see Learn
how to install Windows Vista Service
Pack 1 (SP1).
To learn if SP2 is already installed
- Click the Start button
 ,
right-click Computer, and then click Properties.
,
right-click Computer, and then click Properties.
If Service Pack 2
is listed in the Windows
edition section, SP2 is already installed on your computer and you don't
need to follow the instructions below.
Before you install SP2, we recommend
you do the following:
- Log on to your computer using an administrator account,
make sure all other users are logged off of the computer, and close all
open programs.
- Back up your important files to an external location,
such as an external hard disk, DVD or CD, or USB flash drive. For more
information, search for "backup" in Windows Help and Support.
- If you're using a laptop computer, connect it to an AC
electrical outlet and don't unplug or restart the computer during
installation.
- Update any device drivers as necessary. You can do this
by using Windows Update or by going to the device manufacturer's website.
For more information, see Update a driver for hardware that isn't working
properly.
- If you have an uninterruptible power supply (UPS)
connected to your computer, disconnect the connecting serial cable before
installing SP2. The installation automatically attempts to detect devices
connected to serial ports, and UPS equipment can cause problems with the
detection process. It's fine to leave your computer connected to a UPS for
power.
- Some antivirus software might prevent SP2 from
installing, or might slow down the installation. You can try temporarily
disabling your antivirus software. If you do so, be sure that you're aware
of the risks involved, and be sure to enable it after the service pack is
installed.
- Make sure you have enough free disk space to install
SP2 (even though much of that space will be reclaimed after the
installation). If you need to create free disk space, go to Strategies for freeing disk space online.
|
Installation
method
|
Approximate
free disk space required
|
|
|
Windows Update
|
o
x86-based:
684 MB
o
x64-based:
863 MB
|
|
|
Downloading SP2 from the Microsoft
website
|
o
x86-based:
1.8 GB to 3 GB
o
x64-based:
3.2 GB to 5 GB
|
|
|
Integrated installation for
enterprise and IT professionals
|
o
x86-based:
10 GB
o
x64-based:
13 GB
|
Installing
SP2 using Windows Update (recommended)
If your computer is set to automatically install updates, you'll
be prompted by Windows Update to install SP2.
Follow the instructions on the screen. If you aren't prompted to install SP2,
follow these steps:
To install SP2 using Windows Update
1. Make
sure you are connected to the Internet.
- Click
the Start button ,
click All Programs, and then click Windows Update.
3. In
the left pane, click Check for updates.
- Click View available updates. In the list of updates, select Service Pack for Microsoft Windows
(KB948465), and then click Install. If you
are prompted for an administrator password or confirmation, type the
password or provide confirmation.
Note
o
If SP2 isn't listed, you might need to install
some other updates before installing SP2. Install any updates listed as Recommended or Important, return to the Windows Update page, and then click Check
for updates.
5. Follow
the instructions on your screen. The computer might restart several times
during the installation.
6. After
installation is complete, log on to your computer at the Windows logon prompt. You might see a notification
indicating whether the update was successful.
7. If
you disabled your antivirus software, enable it again.
Manually
installing SP2 using the Microsoft Download Center
If you have problems obtaining the service pack from Windows Update, you can download SP2 as a
standalone installation package from the Microsoft Download Center website, and
then install SP2 manually.
To manually install SP2 using the standalone installation package
1. Depending
on whether you're running the 32-bit or the 64-bit version of Windows Vista, download
the update for 32-bit versions or download
the update for 64-bit versions.
- To
determine whether you have the 32-bit or the 64-bit version of Windows Vista, click the Start
button ,
right-click Computer, and then click Properties.
2. To
install SP2 immediately, click Open or Run,
and then follow the instructions on your screen. To install SP2 later, click Save to copy the installation file to your computer. When
you're ready to install the service pack, open the file you copied to your
computer.
3. On
the Welcome to Windows Vista Service Pack 2 page, click Next.
4. Follow
the instructions on your screen. The computer might restart several times
during the installation.
5. After
installation is complete, log on to your computer at the Windows logon prompt. You'll receive a message
indicating whether the update was successful.
6. If
you disabled your antivirus software, enable it again.
Manually
installing SP2 using the installation DVD
You can order a DVD from Microsoft containing SP2. For more
information, go to the Microsoft
website.
To manually install SP2 using the installation DVD
1. Insert
the disc into your computer with your current version of Windows Vista running. The Install
Windows Service Pack
wizard should automatically appear.
If the wizard doesn't appear, click the Start
button ,
click Computer, right-click the drive containing the
installation disc, and then click Install or run program.
2. On
the Welcome to Windows Vista Service Pack 2 page, click Next.
3. Follow
the instructions on your screen. The computer might restart several times
during the installation.
4. After
installation is complete, log on to your computer at the Windows logon prompt. You'll receive a message
indicating whether the update was successful.
5. If
you disabled your antivirus software, enable it again.
If you installed SP2 yourself, you can uninstall it. However, if
your computer came with SP2 already installed (an integrated installation), it
can't be uninstalled.
To uninstall SP2
- Click
the Start button ,
click Control Panel, and then click Programs.
2. Under
Programs and Features, click View
installed updates.
3. On
the Uninstall an update page, click Service
Pack for Microsoft Windows (KB948465), and then
click Uninstall.
4. Follow
the instructions on your screen.
How to upgrade from Windows 7 to
Windows 8
In
this final series looking at upgrading to Windows 8, we transition from the
most recent version of Windows, Windows 7. Launched in October 2009, Windows 7
is Microsoft’s most successful release of the operating system to date. With an
estimated 630 million licenses sold, Windows 7 probably represents the pinnacle
of success when it comes to client operating systems.
Is it worth upgrading to Windows 8
from Windows 7?
This
is ultimately a personal decision, Windows 7 is a modern operating system that
supports all the advances available today in hardware and software. It also
prepares for a future that is centred around mobility and touch. Windows 7 also
supports many of the significant changes that have occurred on the Internet in
the past 10 years. What more could you really want in a desktop OS?
Windows 8 does introduce some
specific advances where Windows 7 does fall short and I will list some of them
here:
- Fast Boot – Windows 8 boots significantly faster than
Windows 7, in fact on an SSD, I can have Windows 8 up and running in 5 to
7 seconds.
- Fully Touch Ready – This has been a miss on on prior
versions of Windows going back to Windows XP Tablet PC edition. Windows 8
features a smart, fluid and fast interface that is significantly
engineered for Touch called the Start Screen. There is just no
disadvantage when using it with Touch. You can swipe, pan, zoom and do all
the key actions expected on a Touch device. Microsoft has also created an
environment that will encourage third party developers to create touch
ready applications just for Windows 8. These applications will not run on
Windows 7.
- Fully compatible with existing hardware and software.
If it works with Vista or Windows 7, it is guaranteed to work with Windows
8.
- Tighter Internet integration – Windows 8 features a
holistic integration with services that deliver information right to your
screen without much need for you to find and discover it.
- The ability to sync information across multiple devices
makes Windows 8 a truly Internet ready operating system.
These are just some of the key areas
where Windows 8 advances over Windows 7. They may or may not entice you, but if
you are going to upgrade, here are some steps to help you make a smooth
transition to Windows 8.
One
of the major differences between upgrading from Windows 7 compared to Windows
Vista and XP is, Windows 8 allows you to preserve your installed applications
when upgrading from Windows 7. This avoids the need to do things like reinstall
hardware drivers and applications. Upgrading also preserves your Windows
Settings too.

In
this scenario, I have a typical Windows 7 setup with some applications
installed and some personal files stored in the Documents Library. In this
scenario, we are going to upgrade to Windows 7 while looking at how it
preserves your existing investments.
Notes:
- Gather all important
application discs and hardware driver discs you might need to be
reinstalled.
- Check the manufacturer and
software developers website for updates available and to find out about
the status of compatibility with Windows 8. It is possible that if the
software is compatible with Windows Vista it will likely work with Windows
8 since they share the same driver model.
- If you are using software such
as iTunes or Adobe programs, remember to deauthorize and deactivate them
before running setup.
When
making significant changes to your computer such as an upgrade, it is always
recommended you backup your system prior to installing a new version of
Windows. Thankfully, all editions of Windows 7 includes system imaging, which
means you can backup your entire Windows 7 installation and restore it if it
fails.
In addition to System Imaging, you
can backup just your personal files using Backup and Restore, to do that, check
out the following article:
http://notebooks.com/2010/12/27/how-to-backup-to-an-external-hard-drive/
http://notebooks.com/2011/02/25/how-to-restore-a-backup-from-an-external-hard-drive-in-windows-7/
http://notebooks.com/2011/02/25/how-to-restore-a-backup-from-an-external-hard-drive-in-windows-7/
If you want to backup themes,
wallpapers and other minor features, Windows Easy Transfer is another option,
you can learn more about it here
What you can do before attempting
the upgrade?
You
can do some pre-requisite tasks to ensure a smooth migration from Windows 7 to
Windows 8. If you are using a name branded computer such as a Dell or HP, go to
the manufacturers website for the model computer you are using and download the
latest available drivers for that computer. Store them on a disc or USB thumb
drive. Important drivers you should try to obtain include Network and Video
Drivers. Its possible that they might just have Windows Vista or Windows 7
drivers, those will work with Windows 8.
Other things you can do:
- Uninstall any security software before attempting to
upgrade.
- Disable any encryption software you might have
installed.
- Disable/uninstall disk utility software such as DVD/CD
burning utilities or third party defragment programs such as Perfect Disk.
- Make sure your computer is updated (devices and
applications).
- Disconnect any external devices before installing.
- Check your hard disk for any errors:
- Click Start
- Type: CMD
- Right click CMD then click Run as administrator
At the Command Prompt, type: chkdsk /r /f
Exit the command prompt.
When you restart your system, your computer will be scanned for errors and attempts will be made to correct them. - Another thing you can do is disable Start items:
- Click Start
- Type: MSCONFIG.
- Hit Enter on your keyboard
- On the General tab, click Selective Startup.
- Under Selective Startup, click to clear the Load
Startup Items check box.
- Click the Services tab, click to select the Hide All
Microsoft Services check box, and then click Disable All.
- Click OK.
- When you are prompted, click Restart.
- After the computer starts, check whether the problem is
resolved.
Run the System File Checker utility.
SFC/Scannow checks your Windows
installation for errors and corrects them. This will help with ensuring that a
smooth upgrade occurs.
Click Start
Type: CMD, from the results, right click CMD
Click ‘Run as Administrator’
At the Command Prompt, type: sfc/scannow
Type: CMD, from the results, right click CMD
Click ‘Run as Administrator’
At the Command Prompt, type: sfc/scannow
This will check for any integrity
violations
Restart your system
32 or 64 bit
My
recommendations depend on what you have installed. If you currently have 32 bit
Windows 7 installed, use 32 bit Windows 8. If you have 64 bit Windows 7, use 64
bit Windows 8. This is to ensure a smooth migration, especially where driver
compatibility is concerned. Another factor is RAM. If you have max 3 GBs of
RAM, then 32 bit should be sufficient for your needs. If you happen to have 4
to 8 GBs or more RAM, then 64 bit would be suitable.
Windows
64 bit comes in handy when you need to address at least 4 GBs or more of RAM.
Windows 32 bit can utilize up to 3.2 GBs of RAM. Because the memory address
space is much larger for 64 bit Windows, that means, you need twice as much
memory than 32 bit Windows to accomplish some of the same task, but you are
able to do so much more, you can have more applications open, do things like
run an Antivirus scan in the background without it affecting your system
performance. Windows 64 bit is more secure too, malicious code cannot easily
infiltrate it, drivers are more reliable since they must be signed before they
can work with 64 bit Windows.
As for compatibility, you will need
64 bit device drivers for any hardware devices you might have. Also, there is
no 16 bit subsystem in Windows 64 bit, which means, your applications must be
32 bit only, not 16 bit installer or uninstallers.
Starting setup
To
start the installation, first boot to the Windows 7 desktop. If you are
installing Windows 8 from a physical DVD these instructions will apply to you.
Insert the Windows 8 disc. When the AutoPlay window appears, click ‘Run
setup.exe’. Click Continue when prompted by User Account control.

Setup will then begin.

Wait while setup prepares to install
Windows 8.

If prompted to get updates, I
recommend you do so. If you are not connected to the Internet, select ‘No,
thanks’.
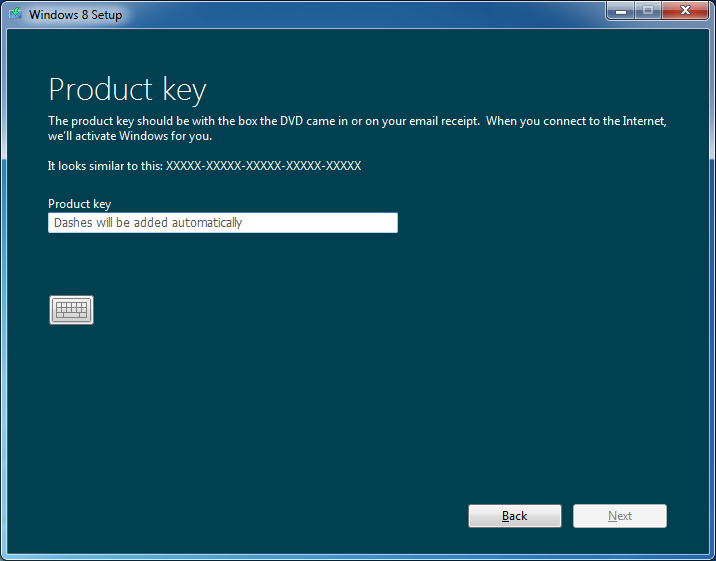
Enter
your product key. If you purchased Windows 8 from the Microsoft Store and you
are using the Windows 8 Upgrade Assistant, the key will be embedded. If you
download a .ISO file or purchased Windows 8 on DVD, check your email when you
registered to purchase the upgrade or check your Windows 8 product packaging
for the product key. After Entering the product key, click Next to continue
with setup.

Read and Accept the End User License
Agreement.
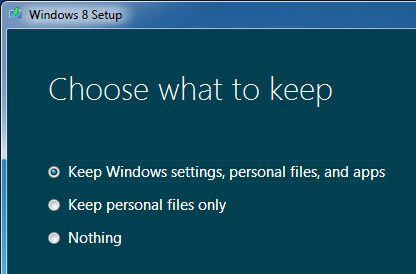
In
addition to being able to keep your Windows Settings and Personal files, you
can keep your personal files too when upgrading from Windows 7. If you choose
Nothing, Windows 8 will place your files in a folder called Windows.old. After
making your decision, click Next.

Wait while Windows 8 does some last
checks.

Depending
on your configuration, Windows 8 setup might ask you to uninstall a program or
driver then restart your system before it can proceed with the upgrade. Don’t
worry though, Windows 8 will resume setup automatically. In my case, Windows 8
setup needed a restart before it could continue.

After restarting, Windows 8 setup,
asked if I would like ‘Continue from where I left off’. I clicked Next and
setup resumed.

At
the summary screen, review the changes that will be made to your computer. If
you are not sure, click Back and make any appropriate changes. As noted, you
will not be able to use your computer during this period. The time it takes to
complete the upgrade will be dependent on your system specifications such as
processor speed, memory and your data set. Click the Install button to begin.

Windows 8 setup will go into full
screen mode and restart several times.

After your computer restarts,
Windows 8 will continue setup. Windows setup will go through several screens
indicating Tasks it needs to complete:
- Windows setup will say its ‘Preparing’
- Getting your devices ready.
- Getting system ready
Then restart and setup will
continue.

Windows 8 will now indicate it is
‘Moving your settings’
Out of Box Experience.

You will now arrive at the Out of
Box Experience where you will setup and personalize your Windows experience.

The first option presented is the
Color Picker, here you can choose a color that represents you. You have up to
25 to choose from. If you can’t decide now, you can always do it later. Click
Next

The settings screen screen allows
you to customize whether you want to have Windows send information about
Windows to Microsoft to ensure it runs smoothly. Click Use Express settings if
you accept these actions. If you rather not, you can click Customize and make
your choices.

Confirm password which you had used
to log into your Windows 7 account. Click Next

You
have the option of setting up a Microsoft Account which allows you to sync your
Windows Settings across multiple Windows 8 devices. You can sync some
passwords, themes and application settings. If you don’t want to do that right
now, click Skip. You can always switch to a Microsoft Account later. Windows 8
will instead use your existing account as a Local account.

- Wait while Windows 8 finalizes your settings.

Wait while Windows 8 does some final
configuration.
You have successfully migrated from
Windows 7 to Windows 8. To check if your files are there, launch the Windows
Desktop App.

Launch File Explorer on the Windows
Taskbar and open documents and you should see all your files previously in
Windows 7.

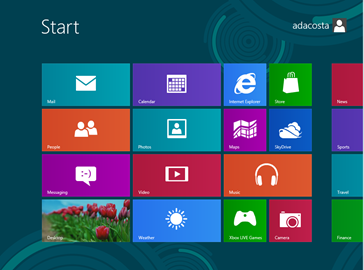
To launch your applications, go to
the Start Screen by pointing your mouse pointer to the left hand corner of the
Windows 8 screen and click it.

Scroll to the right and launch your
application.
0 comments:
Post a Comment